Chart Admins have two options available for exporting a Chart from Teams:
- Export the structure in a text-only format which can be:
- Used to use as a backup that can be imported to recreate the Chart
- Edited to make updates to a structure that can then be imported back into Teams.
- Export the structure in a text-and-images format to use with Microsoft Visio. This option is useful if you want to print a chart, since Visio provides the tools required to manipulate org charts (which often are very wide and/or very tall) so they work in printed form.
Tips:
- Once you have exported the text file, change its file extention from .txt to .csv in your file manager. When you open the .csv version in Microsoft Excel or Google Sheets it will be much easier to understand.
- Org charts are often very high and/or very wide, making them hard to print or visualize on a single page in a PDF or slide. Exporting to Visio provides one way you can get the layout you need. Another is to open the Visio export in programs like Lucidchart or draw.io.
Exporting the Chart
To Export a Chart, Chart Admins:
1. In the Teams Left Navigation, select the Chart you wish to export.
2. Place your cursor over the i-icon to the left of the Chart's name and click Export Chart.
3. On the Export Chart screen, select your format option and click Download.
If you selected Export for Chart backup, you can import the downloaded file, or a modified version of it, to restore this Chart or to create a new one. Click here to learn how to import files to create Charts.
Tip: Use the file manager on your device to edit the extension on the name of the exported file from .txt to .csv. This will allow you to then open this file in Excel or Google Sheet so that it is understandable. When you go to import the file again, you can leave it as .csv and import it in .txt mode, as if it was a .txt file.
Importing your Chart to Visio
Once the file has finished downloading you will have a ZIP file contains the main .txt file that you will import to Visio, as well as a directory containing all of your users' photos. After you've extracted the contents from the ZIP file, you can then open Visio to begin the process of importing the Chart.
Note: Visio exists in various vintages and forms, not all of which use the same file formal. It the process set out below is not working for you, please email us at support@jostle.me. Visio 2013 Standard, Visio 2013 Professional, Visio 2016 should all follow the basic workflow set out below.
1. Click on New, then select the Organizational Chart graphic.
2. When the pop-up window appears click Create.
You will then be guided through an Organization Chart Wizard, we've listed out the steps for you below (see screenshots for point of reference).
3. Select the "already stored in a file" option, then click Next.
4. Select the text (.txt) option, then click Next.
5. Click Browse, select the .txt file that was extracted from the downloaded ZIP file, click Next.
Note: If you get an error, please go here first.
6. Here you will indicate which columns in the text file define the organization structure, then click Next.
7. Next, choose the fields you would like to be displayed for each Org Chart box on your Visio chart. Highlight a field from the "Data file columns" list, then click Add to move it to the "Displayed fields" list.
Once you have mapped over all of the desired fields click Next. We suggest you choose the "Name" column as the main field to display.
8. By default, Shape Data fields are not displayed by Visio in the Org Chart. Shape data fields represent additional information that Visio can store for each Org Chart box. For further information about how to create data graphics, consult the Visio support documentation.
9. If you want to include Profile photos, locate the Photos folder containing your user photos (it was also extracted from the ZIP file) and specify to match the pictures based on the PhotoFile column; then click Next.
10. Here you have the ability to break the Org Chart diagram into separate pages.
"Pages" refers to the the piece of the org chart you wish to display. You have the ability to break the single Org Chart up into smaller pieces (i.e., multiple "pages"). The screen capture shows what to specify, should you want to have the Org Chart be produced as a single "piece" starting from the top.
To achieve this, define as a single "page" with the person at the top of the Org Chart selected as the Employee to appear at the top of the "page" and then choose to display "All Subordinates" of that person.
When you're done click Finish.
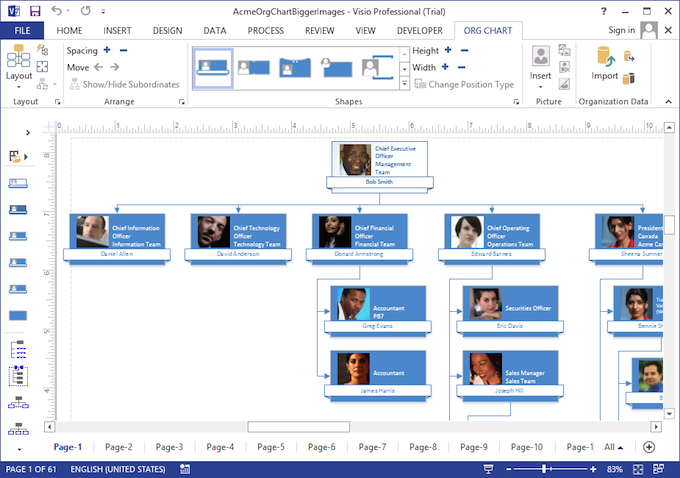
Voila! Your organizational chart is now ready for you in Visio.
Error during Step 5?
If you’re importing to Visio 2013 or 2016, then you may run into a "Name" error during Step 5 if you try to upload the .txt file. To work around this, use Google Sheets to convert the .txt file into an .xls file (avoid using Excel to convert the file, as it will sometimes carry over non-printable characters from the .txt file, which will still cause the error). If you don't have Google Sheets and would like us to do this for you please email us at support@jostle.me.
- Open a new spreadsheet in Google Sheets
- Go to File > Import
- Locate and select your .txt file
- Go to File > Download as and select Microsoft Excel (.xlsx)
- Go to your new .xlsx file and rename the extension .xls
- Return to Step 5 of Importing your Chart to Visio and use Browse to locate and add the .xls file
- Complete the remaining Importing your Chart to Visio steps
Should you have any additional questions please don't hesitate to contact us at support@jostle.me.
0 Comments